Getting Started on the Supercomputer
This page was translated by an AI (LLM) with a cursory human check and is awaiting full review.
Introduction
Are you new to the Jean Zay supercomputer?
On this page, you will find the main points essential for accessing Jean Zay, making your first connection and submitting your first job.
This page is primarily aimed at new users of IDRIS. It is designed to be concise to ensure a quick start with the supercomputer. For more information on the various points covered, please refer to the full documentation.
And for a quick overview of useful Linux, Module and SLURM commands for Jean Zay users, see the cheatsheet above.
Do you have a question or request?
The IDRIS User Support is available,
Monday to Thursday from 9 am to 6 pm and Friday from 9 am to 5:30 pm:
📥 assist@idris.fr
☎️ +33 (0)1 69 35 85 55
Presentation of the Jean Zay machine
Jean Zay is a supercomputer composed of five partitions:
-
one scalar partition (nodes equipped only with CPUs)
-
and four accelerated partitions (hybrid nodes equipped with both CPUs and GPUs).
All nodes access a shared file system via a very high bandwidth interconnect network.
A complete hardware description is available on the page The Jean Zay supercomputer.
Here is an overview of the machine's architecture:
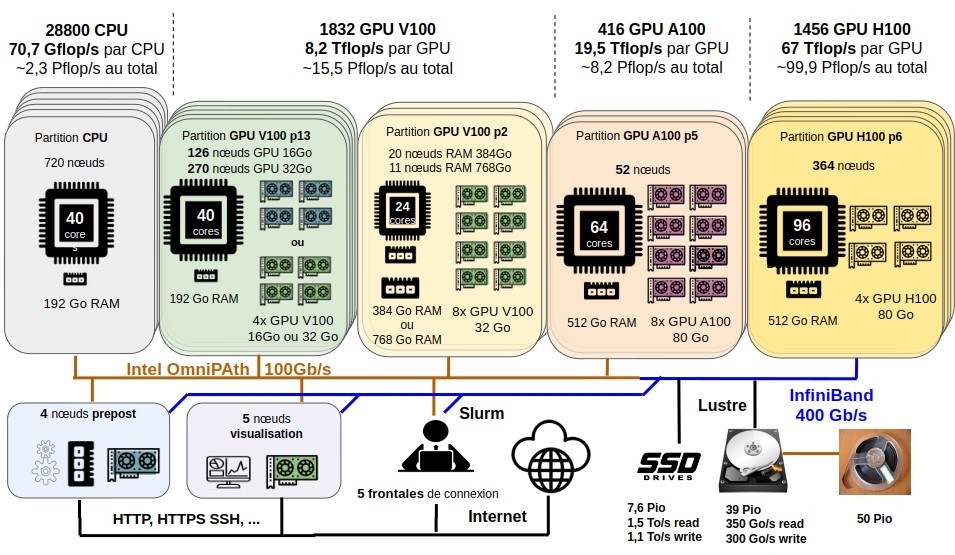
All DARI projects with CPU or/and GPU hours have compute partitions defined on Jean Zay. These allow users to choose the type of resource (CPU or GPU) they wish to use. The table below summarises the main characteristics of these partitions.
| Partition | Name | CPUs per node | CPU RAM | GPUs per node | GPU RAM |
|---|---|---|---|---|---|
| CPU | cpu_p1 | 40 | 192 GB | - | - |
| quadri-GPU V100 | p13 | 40 | 192 GB | 4 | 16 GB / 32 GB |
| octo-GPU V100 | p2 | 24 | 384 GB / 768 GB | 8 | 32 GB |
| octo-GPU A100 | p5 | 64 | 512 GB | 8 | 80GB |
| quadri-GPU H100 | p6 | 96 | 512 GB | 4 | 80GB |
-
For more information on the different partitions, see the pages on SLURM CPU partitions or/and SLURM GPU partitions.
-
All projects with CPU or/and GPU hours also have access to partitions dedicated to pre- and post-processing, visualisation, compilation or archiving. On these partitions, computing hours are not deducted from your allocation. For more information on these partitions, see the page SLURM CPU partitions.
Accessing the supercomputer
Any request to open an account on the Jean Zay machine is made on the eDARI portal.
This request involves a request to join a scientific project with computing hours on the supercomputer. You can therefore join an existing project with the agreement of its project leader or create your own project. Creating a scientific project is done via a request for computing hours on theeDARI portal.
Beforehand, we recommend that you consult the GENCI note detailing the terms of access to national resources. You will find, among other things, the conditions and criteria for eligibility to obtain computing hours and an account on the supercomputers.
It is the public operator GENCI (National High-Performance Computing Facility) that manages the allocation of computing resources for all national centres (CINES, IDRIS and TGCC).
To compute on Jean Zay:
To be able to compute on Jean Zay, you will need to complete the following three steps:
- Create a user account on eDARI
- Request an hour allocation (unless joining an existing project)
- Request the creation of a Jean Zay user account (with project attachment)
- 1. eDARI User Account
- 2. Computing Hour Allocation
- 3. Jean Zay User Account
Create a user account on eDARI
First, you must create a user account on https://www.edari.fr/user/login using your institutional email address.
This account is solely intended to access your personal space on the eDARI site to carry out all administrative procedures (requests for computing hours, opening accounts on Jean Zay, etc.) which must be done from eDARI. It has no link with any potential Jean Zay user account.
You will find more information on hour requests and account opening requests on Jean Zay in the following video:
Requesting a computing hour allocation
There are two types of access to resources depending on the number of hours requested:
- regular access and
- dynamic access.
The main differences between them are summarized below:
| Regular Access (AR) | Dynamic Access (AD) |
|---|---|
| ≥ 500k CPU hours ≥ 50k normalized GPU hours∗ | < 500k CPU hours < 50k normalized GPU hours∗ |
| Two allocation sessions per year: - in May (submission of application before Feb.) - in Nov. (submission of application before Sept.) | Open all year round: validation of an AD takes a few days |
| Technical and scientific reviews | No review |
(∗) 50k normalized GPU hours = 50k V100 hours or 25k A100 hours or 12.5k H100 hours.
For further information on the request and the different types of access, consult the page concerning Hour Requests.
Requesting the creation of a computing account
There is no automatic or implicit account creation. Therefore, you must also request the opening of a computing account (Jean Zay user account). This request is also made via eDARI for Jean Zay.
The information provided is automatically transmitted to our administrative user management service (gestutil@idris.fr) for the follow-up of your request on the IDRIS side. You may be contacted by this service if your situation requires further information and/or additional steps for the creation of your computing account.
For further information on requests for computing account creation, consult the page Account Opening / Closing.
Any machine used to access the IDRIS supercomputer via the SSH protocol must be registered in the IDRIS filters. To do this, every user must provide, when requesting account creation, the list of machines with which they will connect to the IDRIS supercomputer (see Declaring connection machines.)
To make modifications to an existing account (e.g. modify connection IP addresses, reset your password, etc.), please complete the FGC Form.
Connection
First connection via SSH
The first connection to Jean Zay must be made via SSH, from an institutional address registered in the IDRIS filters and associated with your computing account:
ssh login@jean-zay.idris.fr
For your first connection, you must use your initial password consisting of the concatenation
- of the randomly generated password by IDRIS (sent by email)
- and the password you entered when requesting to open an account (eDARI).
This password will be changed immediately upon first connection (automatic procedure) to set your current password. You will find an example of a first connection in Password Management.
- On the first connection, the initial password is requested twice (once for the connection and a second time to change the initial password).
- Being immediately disconnected after the new password has been accepted (
all authentication tokens updated successfully) is normal.
Once connected, you arrive on one of the 5 login nodes of Jean Zay. These nodes, shared by all users, are dedicated to setting up the computing environment and should not be used for calculations (they are not equipped with GPUs).
Unlike the compute nodes, the login nodes have an HTTP/HTTPS proxy allowing data to be downloaded from remote servers (via the HTTP/HTTPS protocol with commands git or wget for example).
For more information on connecting to Jean Zay (targeting a specific login node, SSH connections by key or with a certificate, etc.), see the page SSH Access and Shells.
Connection via JupyterHub
The IDRIS teams have set up a JupyterHub solution that allows the use of Jupyter Notebooks and other applications such as VSCode, MLflow or Dask via a web interface without prior SSH connection to the machine.
An initial SSH connection to Jean Zay is essential before using JupyterHub.
Managing your data
Disk spaces
Each user has a personal HOME space (unique even for users attached to multiple projects).
In addition, for each project the user participates in, 4 disk spaces with various characteristics are accessible: WORK, SCRATCH, STORE and DSDIR.
To store your files, be sure to choose the best disk space according to their respective characteristics. This is essential to avoid saturating your quotas (failed calculations) or data loss (automatically purged disk space).
The table below summarises their main characteristics. For more information on how to better use your disk spaces, see the page Disk Spaces.
| Disk Space | Default Capacity | Usage | Command |
|---|---|---|---|
| $HOME | Quotas 3 GB / 150k inodes per user | - home directory when connecting interactively - intended for small files (e.g. configuration files) - unique in the case of multi-project login | cd $HOME |
| $WORK | Quotas 5 TB / 500k inodes per project * | - workspace and permanent storage - designed to accommodate large files (e.g. input/output data) | User-specific part:cd $WORK Common part accessible to all project users: cd $ALL_CCFRWORK |
| $SCRATCH | Very large security quotas 4.6 PB shared by all users | - workspace and semi-temporary storage - Lifetime of files not read or modified: 30 days - Optimal performance for read/write operations | User-specific part:cd $SCRATCH Common part accessible to all project users: cd $ALL_CCFRSCRATCH |
| $STORE | Quotas 50 TB / 100k inodes per project * | - archive space - accessible from the login nodes and the prepost, archive, compil and visu partitions | User-specific part:cd $STORE Common part accessible to all project users: cd $ALL_CCFRSTORE |
| $DSDIR | - | - space visible to all Jean Zay users - contains models and large public databases - set up by the IDRIS teams - read-only | cd $DSDIR |
* the project quotas can be increased on request from the project leader or their deputy via the Extranet interface or on request to User Support.
💡 Disk quotas
You can check the usage of your disk spaces using one of these two commands:
idr_quota_userfor a view of your personal usage as a user;idr_quota_projectfor an overview of your project and the consumption of each of its members.
For more information, see the page on Disk Quotas and Viewing Usage Rates.
💡 Best practices for database management
- To avoid saturating your disk spaces, check if the model or database you need is already available on DSDIR.
- If downloading is necessary (non-public database) and its volume requires you to download it to your SCRATCH (very large quotas), keep a copy of your database in the form of archives in the STORE (the SCRATCH is a semi-permanent space). You can then easily restore your database if files have been deleted.
- WORK or SCRATCH?
- WORK: Your files are not subject to any automatic deletion procedure, but the read and write performance is worse than that of the SCRATCH. The quotas are also more restrictive.
- SCRATCH: Very large quotas and better read and write performance. But, files not accessed for 30 days are automatically deleted!
- If you are working on a public database, we can download it for you into the shared disk space DSDIR. The data will then be accessible to all users.
- For more information on best practices for managing your data, see the page Databases.
Transferring data between your login machine and Jean Zay
If you need to transfer data between your machine and Jean Zay, you can use the commands related to SSH (sftp and scp).
  # Sending a local file to Jean Zay
  scp localSource login@jean-zay.idris.fr:JZDestination

  # Retrieving a file from Jean Zay to the local machine
  scp login@jean-zay.idris.fr:JZSource localDestination
or
  # Connecting to the remote server via SFTP
  sftp login@jean-zay.idris.fr destination

  # Sending a local file to Jean Zay
  sftp> put localSource JZDestination

  # Retrieving a file from Jean Zay to the local machine
  sftp> get JZSource localDestination
For this to work, your machine must be registered in the IDRIS filters or you must go through a registered machine!
For more information on how to transfer data in batch, see the page Transferring data between IDRIS and your login machine and this cheatsheet.
Computing environment
IDRIS provides a catalogue of tools (virtual environments, compiled libraries, etc.) accessible via the command module.
The module command
To load the products installed on Jean Zay, you need to use the command module. The table below summarises the basic module commands.
| Action | Module command |
|---|---|
| display the modules containing the requested package | idr_module_search <package> |
| display the complete catalogue | module avail |
| search for a specific tool | module avail <package> |
| get info on a module | module show <package> |
| load a module | module load <package>/<version> |
| unload a module | module unload <package> |
| display the list of loaded modules | module list |
| start from a clean environment | module purge |
To access the modules adapted to the A100 or H100 partition, you must first load one of the following modulefiles:
- For the A100 partition:
module load arch/a100 - For the H100 partition:
module load arch/h100
- The list of modules can be enriched on request by contacting support via assist@idris.fr.
- For more information on using the command
module, see the page Modules
Modules and conda virtual environments
Pre-installed conda virtual environments by IDRIS are accessible via the command module.
- The environment is activated automatically (
conda activate) when the module is loaded (module load conda). - ATTENTION, it is not deactivated (
conda deactivate) when the module is unloaded (module unload conda).
Once the environment is activated, you can view all the Python packages it contains using the commands pip list and conda list.
- It is strongly recommended to use the environments installed by us to obtain the best performance, pool resources and avoid saturating your quotas.
- Any environment can be enriched on request by contacting support via assist@idris.fr.
Modules and compilation
Different compilers and libraries are available on Jean Zay ( module avail ) and can be activated using the command module load.
We strongly recommend that you consult our web page on the use of the command module and the management of dependencies between the versions of the libraries and those of the compilers.
For more information on compilation and the different compilers available, see the dedicated pages.
Job submission
Two working modes are possible:
- in batch
- in interactive
Batch work allows you to close the interactive session after submitting a job, while interactive work requires you to keep the session open to avoid interrupting the execution.
It is strongly discouraged to perform calculations on the login nodes as this can slow them down (or even crash them), which would impact all other users connected to the same node!
In addition, the limits set on these nodes (1 CPU per user and 30 minutes of CPU time per process) do not allow for good performance.
For more information on these two working modes, see the pages Batch Execution and Interactive Execution.
You will find examples below for a quick start.
Batch execution - Example of a SLURM script
Access to computing resources is managed by the Slurm manager for all users.
There are 2 essential steps to working in batch:
- Creating the Slurm script: a file containing the Slurm directives for resource reservation and the commands to be executed.
- Submitting the job: the Slurm script is submitted to the manager via the Slurm commands
sbatchorsrunfor execution on the requested resources.
Access to the various hardware partitions of the machine depends on the type of job submitted (CPU or GPU) and the Slurm partition requested for its execution (See SLURM CPU partitions and SLURM GPU partitions for more information).
- The batch mode does not allow the user to intervene during the execution of the script commands (except to interrupt the job). Therefore, file transfers must be done without having to type a password.
- The compute nodes have no Internet access, which prohibits any downloading (Git repositories, Python/Conda installation, …) from these nodes. If necessary, downloads must be done from the login nodes or from the pre/post-processing nodes before code execution: either interactively, or via the batch submission of cascading jobs.
Below are examples of scripts for executing an MPI code in HPC and a Python script in AI:
- HPC Example
- AI Example
Here is an example of a CPU submission script for a batch MPI job on Jean Zay:
1. Content of the intel_mpi.slurm file:
#!/bin/bash
#SBATCH --job-name=MPIJob                 # job name
#SBATCH --ntasks=80                       # Total number of MPI processes
#SBATCH --ntasks-per-node=40              # Number of MPI processes per node
# /!\ Warning, the following line is misleading but in Slurm vocabulary
# "multithread" refers to hyperthreading.
#SBATCH --hint=nomultithread              # 1 MPI process per physical core (no hyperthreading)
#SBATCH --time=00:10:00                   # Maximum execution time requested (HH:MM:SS)
#SBATCH --output=MPIJob%j.out             # Standard output file
#SBATCH --error=MPIJob%j.out              # Standard error file (here merged with standard output)

# go to the submission directory
cd ${SLURM_SUBMIT_DIR}

# purge interactively loaded and default inherited modules
module purge

# load modules
module load intel-all/19.0.4

# echo launched commands
set -x

# code execution
srun ./exec_mpi
2. Submission of the script via the sbatch command:
sbatch intel_mpi.slurm
For more information on job execution, including different examples (MPI, OpenMP, MPMD, CUDA MPS), see the dedicated page.
Here is an example of a script for execution on the octo-GPU A100 partition:
1. In the gpu_a100.slurm file:
#!/bin/bash
#SBATCH --job-name=GPUJob               # job name
#SBATCH --output=GPUJob%j.out           # output file (%j = job ID)
#SBATCH --error=GPUJob%j.err            # error file (%j = job ID)
#SBATCH --constraint=a100               # request A100 80 GB GPUs
#SBATCH --nodes=2                       # reserve 2 nodes
#SBATCH --ntasks=16                     # reserve 16 tasks (or processes)
#SBATCH --gres=gpu:8                    # reserve 8 GPUs per node
#SBATCH --cpus-per-task=8               # reserve 8 CPUs per task (and associated memory)
#SBATCH --time=20:00:00                 # maximum allocation time (HH:MM:SS)
# #SBATCH --qos=qos_gpu_a100-t3         # QoS (default so commented out)
#SBATCH --hint=nomultithread            # disable hyperthreading
#SBATCH --account=xyz@a100              # A100 accounting (xyz to be replaced
                                        # by the project's unix group)

module purge                            # purge default inherited modules

conda deactivate                        # deactivate default inherited environments

module load arch/a100                   # select modules compiled for A100
module load pytorch-gpu/py3/2.3.0       # load modules

set -x                                  # enable commands echo
srun python script.py                   # execute the script
The table below summarizes the SLURM options to use to select a specific hardware partition:
| GPU Partition | Corresponding SLURM option |
|---|---|
| quadri-GPU V100 with 16 or 32 GB RAM | by default (no option) |
| quadri-GPU V100 with 16 GB RAM | --constraint v100-16g |
| quadri-GPU V100 with 32 GB RAM | --constraint v100-32g |
| octo-GPU V100 (with CPU 384GB or 768GB RAM) | --partition=gpu_p2 |
| octo-GPU V100 (with CPU 384GB RAM) | --partition=gpu_p2s |
| octo-GPU V100 (with CPU 768GB RAM) | --partition=gpu_p2l |
| octo-GPU A100 | --constraint=a100 |
| quadri-GPU H100 | --constraint=h100 |
In the example above, we request two nodes of the gpu_p5 partition (octo-GPU A100 nodes).
#SBATCH --constraint=a100: Selects the octo-GPU A100 nodes.
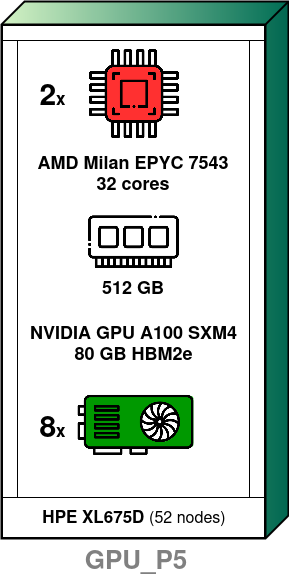
Each of these two nodes gives us access to:
- 8 NVIDIA A100 GPUs with 80 GB of memory
- 64 CPU cores
- 512 GB of RAM memory
-
#SBATCH --nodes=2: Reserves two nodes of the same partition. -
#SBATCH --ntasks=16: The total number of tasks/processes reserved, distributed across the 2 nodes.
It is often equal to the total number of reserved GPUs because generally 1 GPU is allocated per task/process.
-
#SBATCH --gres=gpu:8: The number of reserved GPUs per node. That is 16 GPUs in total because we reserve 2 nodes. -
#SBATCH --cpus-per-task=8: The number of CPU cores reserved per task. Here, there will be 8 tasks per node (16/2) so we reserve 8x8=64 CPUs per node (meaning all CPUs and therefore the memory of each node).
It is recommended to reserve the same proportion of resources per node for CPUs as for GPUs. This avoids overcharging when calculating the computing hours used by the job (see Viewing the consumption of computing hours).
The following table summarizes the ideal proportions per node depending on the partition used:
| Partition | Number of GPUs | Number of CPUs |
|---|---|---|
| gpu_p13 | 1 V100 | 10 CPU cores |
| gpu_p2 | 1 V100 | 3 CPU cores |
| gpu_p5 | 1 A100 | 8 CPU cores |
| gpu_p6 | 1 H100 | 24 CPU cores |
-
#SBATCH --time=20:00:00: Maximum execution time. The maximum time limits depend on the partition and QoS used (see QoS below). -
#SBATCH --qos=qos_gpu_a100-t3: For each job submitted on a compute partition (so other than archive, compil, prepost, and visu), you can specify a QoS (Quality of Service) that will determine the limits and priority of your job. There are 3 different types of QoS:- QoS dev: reserved for short runs (max. 2h) carried out as part of development
- QoS t3: default QoS (max. 20h)
- QoS t4: for longer runs (max. 100h)
TIPEach QoS assigns a different priority to your job. For short tests (less than 2 hours), prefer the dev QoS.
INFOFor more information on QoS, the different limits defined by each of them, and the various commands to specify them depending on the partition, consult the dedicated page.
-
#SBATCH --hint=nomultithread: Disables hyperthreading, forcing the use of a single thread per physical core (using real cores and not logical threads). -
#SBATCH --account=xyz@a100: Specifies the accounting for tracking hours. The project must have an A100 allocation to use A100 GPUs. Here xyz must be replaced by the project's Unix group.
For more information on hour accounting, refer to the Computing hours page.
set -x: Enables the display of executed commands. Each command will be logged.
2. Submission of the Slurm script
Once the submission directives are defined, it is recommended to enter the commands in the following order:
- go to the execution directory WORK, SCRATCH or JOBSCRATCH;
- copy the input files necessary for the execution;
- launch the execution with
sbatch a100.slurm; - optionally copy the result files you wish to keep if you used SCRATCH or JOBSCRATCH.
Tracking the progress of a SLURM job
The table below summarises the main commands for submitting the SLURM script and tracking its progress.
| Command | Function |
|---|---|
sbatch <script> | submit a batch Slurm script |
squeue -u $USER | track the submission status of your jobs |
scontrol show job <jobid> | display all parameters of a submitted job |
scancel <jobid> | cancel the execution of a job |
You can connect via SSH to the compute nodes assigned to your jobs to monitor the execution of your calculations and control resource usage ( top, htop, nvidia-smi,...) : ssh <numéro du nœud>
Interactive execution
Any execution in interactive mode requires reserving resources via the Slurm manager. The time it takes to allocate these resources varies depending on the machine load.
It is impossible to predict the moment at which the requested resources will be allocated. If you are not in front of your machine at that moment, resources will be reserved for your use without you using them.
From machines declared in the IDRIS filters, you have SSH access to the login nodes. You then have 2 options:
- Open a terminal directly on a compute node on which you reserve resources via the command
srun.- Example with reservation of a GPU for 1 hour on the default partition:
login@jean-zay3:∼$ srun --ntasks=1 --gres=gpu:1 --time=1:00:00 ... --pty bashsrun: job 123456 queued and waiting for resourcessrun: job 123456 has been allocated resourceslogin@r13i0n8:∼$- You are then connected to the compute node and can execute your code/script:
login@r13i0n8:∼$ ./script.py- To disconnect:
login@r13i0n8:∼$ exitexitlogin@jean-zay3:∼$ATTENTION- MPI is not supported in this configuration.
- When the time limit (here 1 hour) is reached, the connection to the compute node is automatically cut. The execution is therefore interrupted prematurely.
- Make a resource allocation via the command
sallocand chain executions on these resources via the commandsrun.- Example with reservation of a GPU for 1 hour from the default partition:
login@jean-zay1:∼$ salloc --ntasks=1 --gres=gpu:1 <other-options>salloc: Pending job allocation 654321salloc: job 654321 queued and waiting for resourcessalloc: job 654321 has been allocated resourcessalloc: Granted job allocation 654321- When the allocation is effective, you can chain various executions:
login@jean-zay1:∼$ srun python script_0.py...login@jean-zay1:∼$ srun python script_1.py...- To release the resources:
login@jean-zay1:∼$ exitexitlogin@jean-zay1:∼$ salloc: Relinquishing job allocation 654321ATTENTION- When the time limit (here 1 hour) is reached, the allocation of the compute node is automatically terminated. Any execution in progress is therefore interrupted prematurely.
For more information on interactive execution, see the dedicated page..
Further information
Training
IDRIS provides various training courses for users of HPC and AI scientific computing.
Contact IDRIS
For any questions or requests, IDRIS User Support is available Monday to Thursday from 9 am to 6 pm and Friday from 9 am to 5:30 pm:
- 📥 assist@idris.fr
- ☎️ +33 (0)1 69 35 85 55
Workshops
IDRIS organizes workshops on getting started with the supercomputer and optimizing your computing codes.
- 👨🏽💻 Jean Zay Workshop