

Table des matières
Creation of a Regular Access file (A0xx) via the eDARI portal
Access to the file
Creating this file is done via the eDARI portal www.edari.fr which requires that you have an account defined on this portal. If you do not yet have this account, please see our documentation concerning the creation of an account on the eDARI portal.
When you are on the homepage of the eDARI portal:
- You must identify yourself via the link “Se connecter ou se créer un compte eDARI” (Connect or create an eDARI account) on the top right of the page:

- This opens a new page on which you choose the desired type of connection (Connection via an eDARI account or connection via the “Fédération Éducation-Recherche”.
- Once you are connected on the eDARI portal, you access the homepage of your User Space (« Utilisateur »):

- You then click on the link “Créer ou renouveler un dossier” (Create or renew a file) found in the box under the green topbar LISTE DES ACTIONS GÉNÉRALES POSSIBLES.
- On the page which opens, click on the blue button “Création d'un nouveau d'un nouveau dossier” (Creation of a new file):

REMEMBER: If your ACCUMULATED resource request for the three national centres is superior to the defined thresholds (500 000 CPU hours and 50 000 normalized GPU hours), you will be redirected to Regular Access (AR); if your request is inferior to these thresholds, you will be redirected to Dynamic Access (AD). Regular Access: Once you have validated your file submission, it will receive an expert assessment by the Thematic Committees during the bi-annual project calls; the result of your request will be communicated to you by e-mail. You can, however, complete a regular access file any time during the year. Dynamic Access: Once you have validated your file submission, it will receive an expert assessment by the director(s) of the centre(s) where you have requested resources and if accepted, the hours will be available without delay. - The present document describes the creation of a regular access (AR) file for the AI or HPC communities.
- After reading and validating the page on management of your personal data, click on the blue link “Envoyer et passer à la suite” (Send and continue) to arrive on the first page of the file entry.
Completing the file
Page 1: Project
 |
All the titles marked with a red asterick must be completed. In the section “Description scientifique du projet”, it is important that your scientific project be described clearly to facilitate the expert scientific evaluation, especially if you are requesting a large number of hours.
IMPORTANT: Be careful to choose the correct « Thématique (CT)» (Thematic committee)! You may see the list of CTs by clicking on the link provided. This choice cannot be modified after all the information on the page is saved.
For Artificial Intelligence, choose CT10 and don't forget to enter the application domaine of your project on the page which opens.
Whether your project uses the GPU or the CPU partition of Jean Zay, and whether this is in the AI or HPC domaine, if you will be processing sensitive data (audio, video, health data, etc.), PLEASE TICK “OUI” for the question “Votre projet va-t-il traiter des données à caractère personnel” (Will your project process personal data?). After clicking on the blue button “Suivant” (Next) at the end of the project section, you will be directed to a specific page to declare the person responsible for the processing (this can be yourself or another designated person in your laboratory or research team). In addition, you have the optional possibility of completing a questionnaire about the anticipated data processing: We strongly urge you to complete this questionnaire in order to accelerate the inquiry we will be conducting into the project.
 |
You have the optional possibility to submit an image (« Je souhaite déposer une image … »). This enables GENCI to associate an image with your file when publishing the list of projects receiving resources at the national computing centres. If you tick « Oui », you will be redirected to another page to validate and select an image.
IDRIS does not automatically use the information from this portal regarding a technical correspondant (« correspondant technique »). If you wish to provide this information to IDRIS, you should use the (Administration Form for Login Accounts - FGC) but AFTER your file is accepted and AFTER your computing account associated to the project is accepted. On the FGC form, complete the section « Add or delete a deputy project manager for an existing project » on page 1.
Page 2, Resources
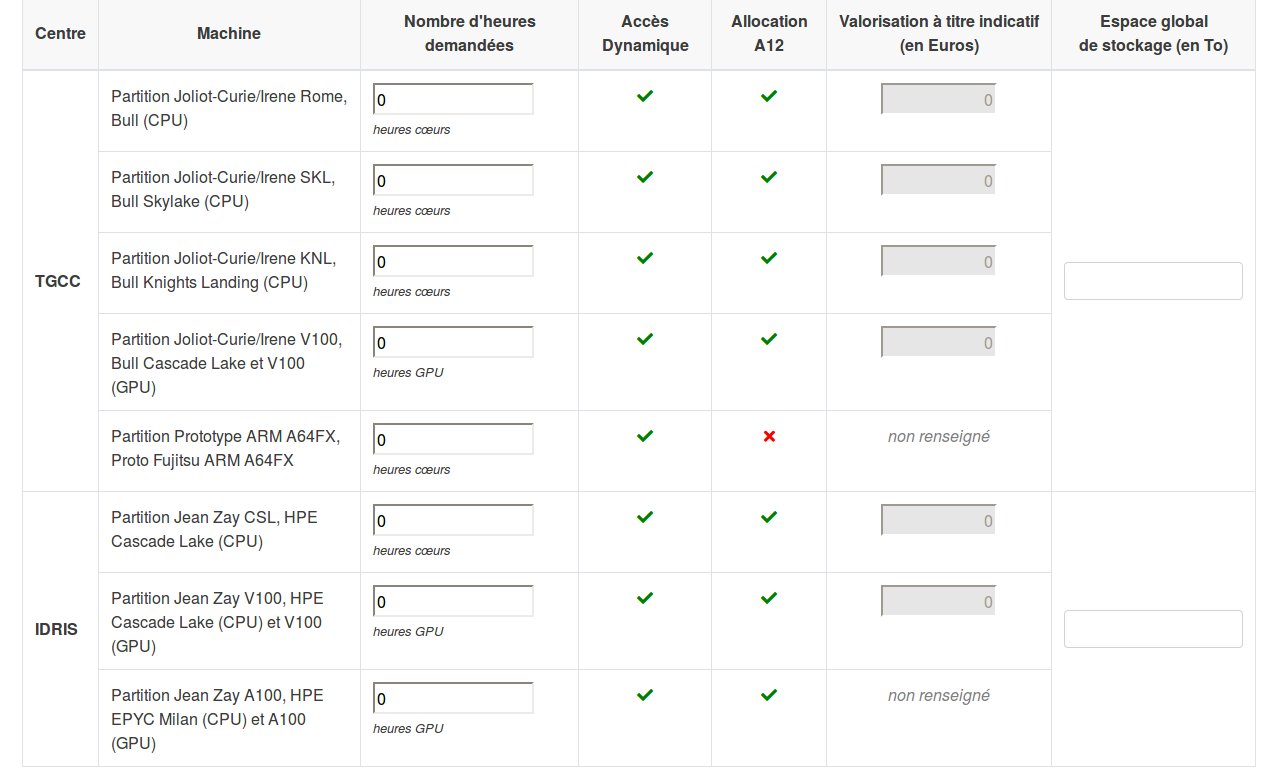
After having completed the requested information about your project, you can enter the resources needed on Page 2:
 |
 |
 |
You can request hours at the three computing centres but in this documentation we will focus on the hours requested at IDRIS. Whether this is for the AI or HPC community, you can request the following hours at the same time: CPU hours (Partition Jean Zay CSL in first space), GPU hours (Partition Jean Zay V100 in second space) and GPU hours on the most recent partition (Partition Jean Zay A100 in third space). IMPORTANT: The GPU A100 partition will not be open to users until 1 June 2022.
On the right, the column “Espace global de stockage (en To)” (Global storage space in GB) is to be completed for specific storage needs you may have throughout the duration of the project. IMPORTANT: This information is mandatory.
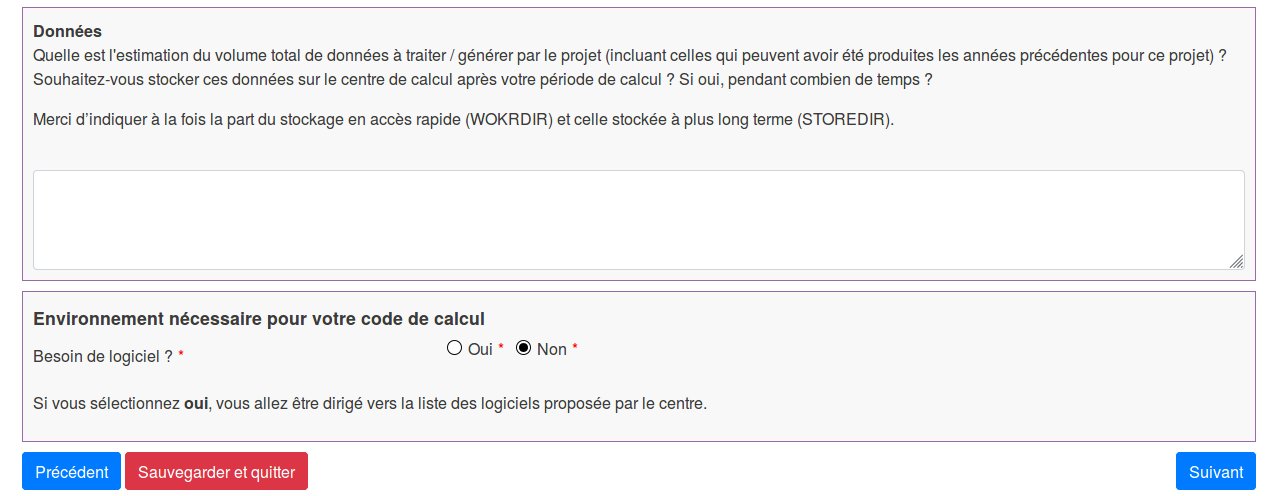
The next section enables you to provide information about the quantity of data to be produced, if these data should be stored at IDRIS and your software needs. (Data (“Données”): What is the estimation of the total volume of data to treat/generate by the project [including data which could have been produced for this project during preceding years]? Do you wish to store these data at the computing centre after your computation period? If yes, for how long?)
The section “Environnement necessaire …” asks if you need certain software to run your code.
If you respond “Oui”, you will be redirected to a specific page which dynamically lists the software available on the partitions which you have requested. In this example, Jean Zay CSL (CPU) hours and Jean ZAY A100 (GPU) hours:
 |
Tick the software which you need. If you need a software which is not on the list, you may click on the blue link “Ajouter” (Add) and indicate the software needed: However, IDRIS cannot guarantee being able to install it.
After clicking on the blue button “Suivant” (Next) on the bottom of page 2, the third page will open on which you will provide information about your research structure.
Page 3, Research structure
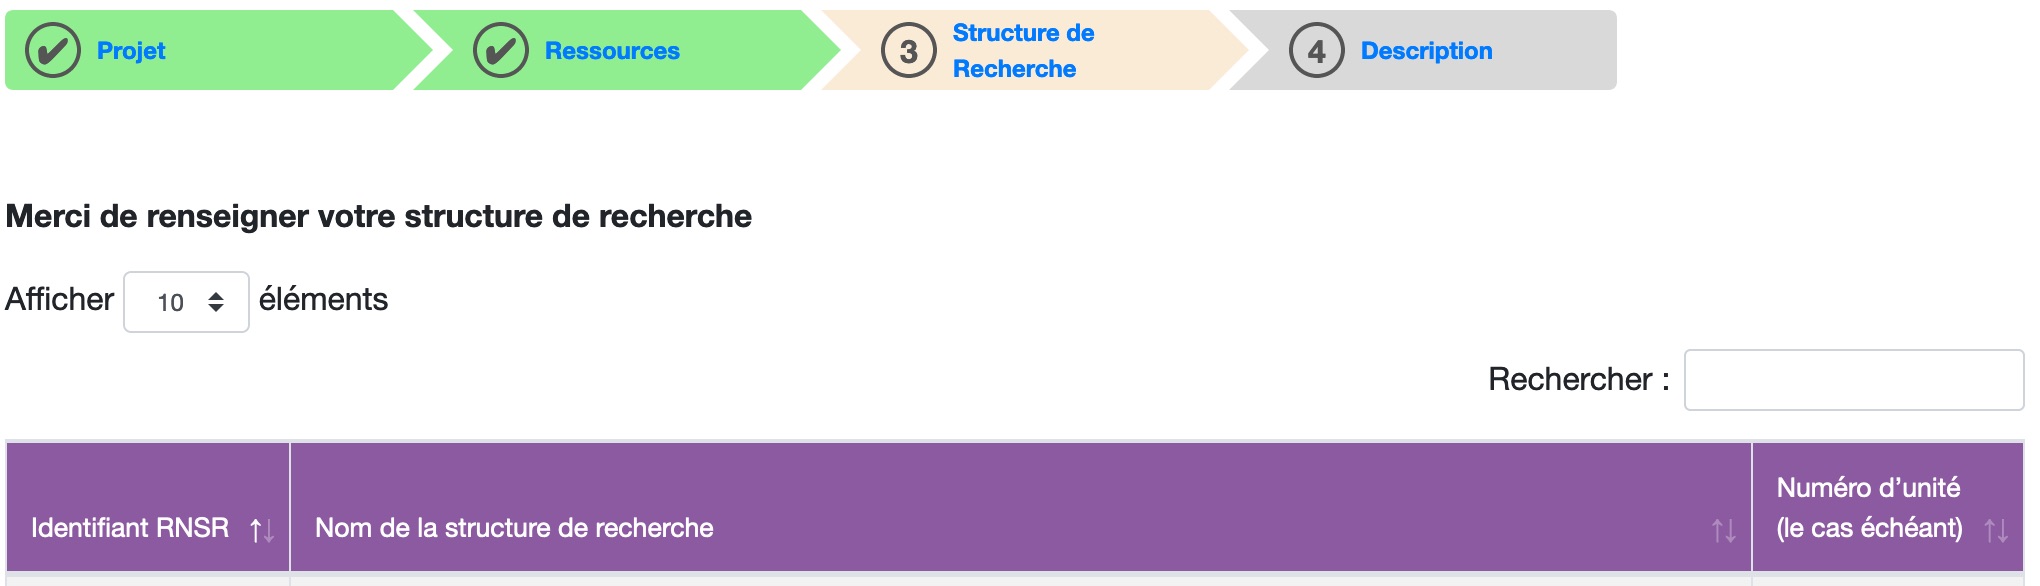 |
In this step, the national directory of research structures (RNSR) is utilised which references thousands of public and private research structures in France. Enter the first letters of your laboratory, organisation or research structure in the search box on the right (“Rechercher”). If this displays a result, click on it to display a summary page of information about your research structure. If necessary, you can modify the postal or telephone contact details. If the director of your structure is identified, this will appear at the bottom of the page but it cannot be modified.
|
In this step, the national directory of research structures (RNSR) is utilised which references thousands of public and private research structures in France. Enter the first letters of your laboratory, organisation or research structure in the search box on the right (“Rechercher”). If this displays a result, click on it to display a summary page of information about your research structure. If necessary, you can modify the postal or telephone contact details. If the director of your structure is identified, this will appear at the bottom of the page but it cannot be modified.
If your research structure is absent from this directory or if you are part of a business company, use the blue button “Je ne trouve pas ma structure de recherche” (I cannot find my research structure) at the bottom of the page:
 |
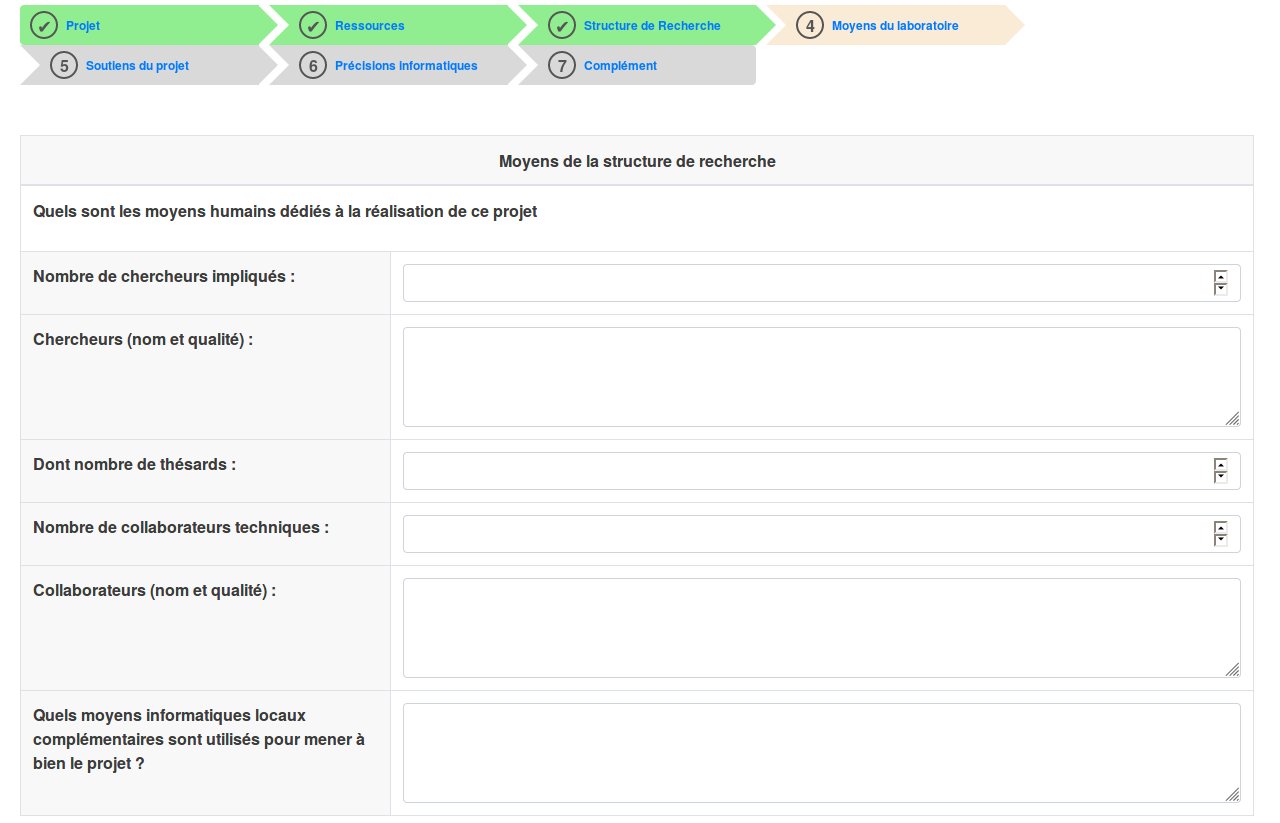
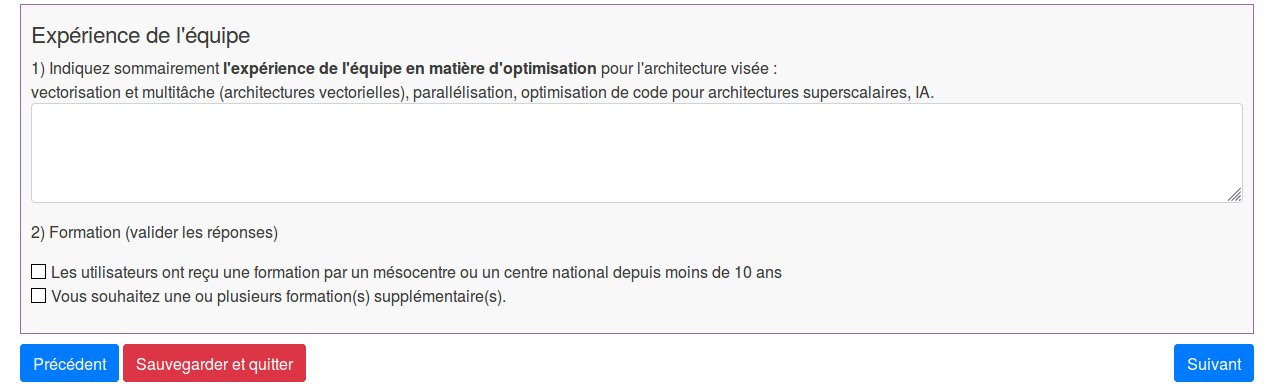
Page 4, Project team and laboratory means
On this page of optional information, you can provide information about the researchers, graduate students and collaborators who are involved in the project. You may also indicate the computing experience (related to optimisation for the target architecture) of the team who will work on the project and the need, if necessary, for training:
 |
 |
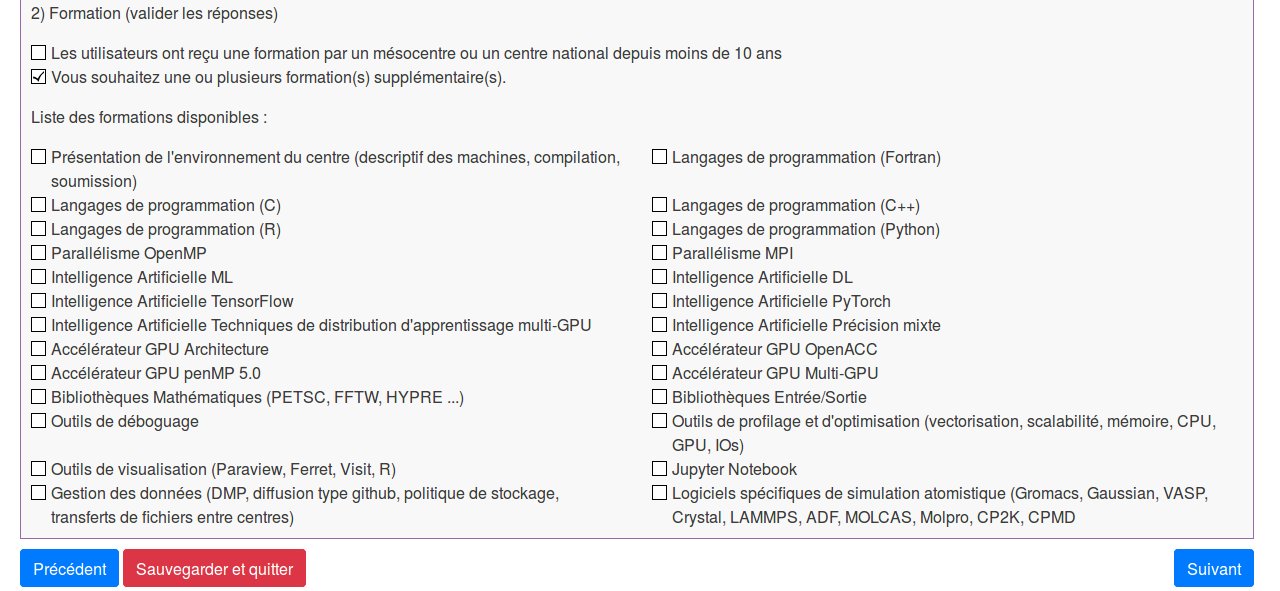
By ticking the box “Vous souhaitez une ou plusieurs formation(s) supplémentaire(s)” (You would like one or more supplementary trainings), you will dynamically obtain a list of available trainings on which you can indicate the training(s) that your team would like to have:
 |
However, if you have ticked the box “Vous souhaitez une ou plusieurs formation(s) supplémentaire(s)”, you must tick one or more of the presented trainings before clicking on the blue button “Suivant” (Next).
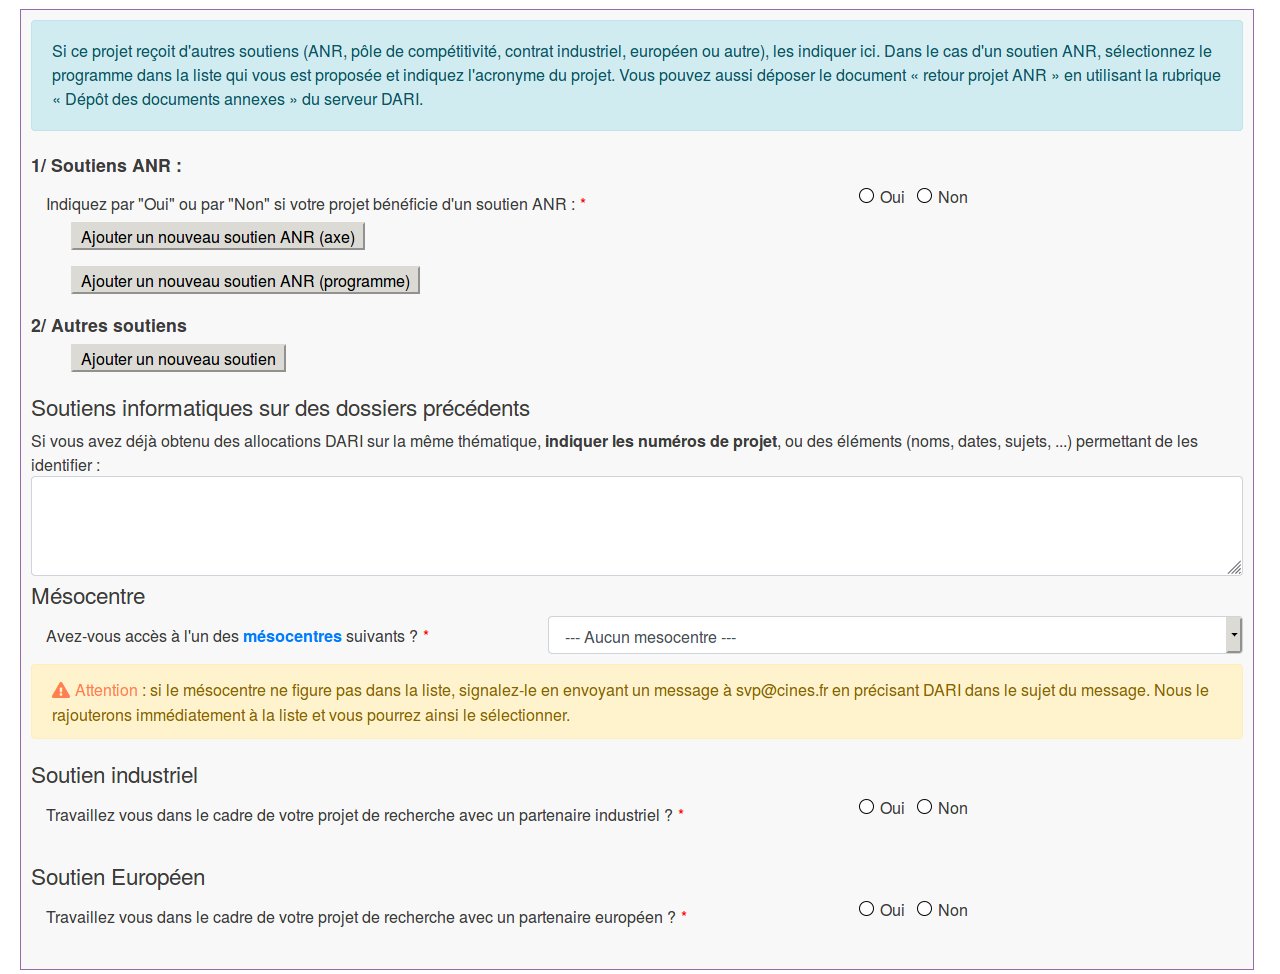
Page 5, Project support
You must provide certain information if your project benefits from funding or other support. Some responses are mandatory (indicated by a red asterisk); others will cause the appearance of supplementary fields to be completed. (Included here are ANR government and competitiveness cluster funding, previous DARI allocations on the same subject, access to a computing mesocentre, and support from an industrial or European partner.)
 |
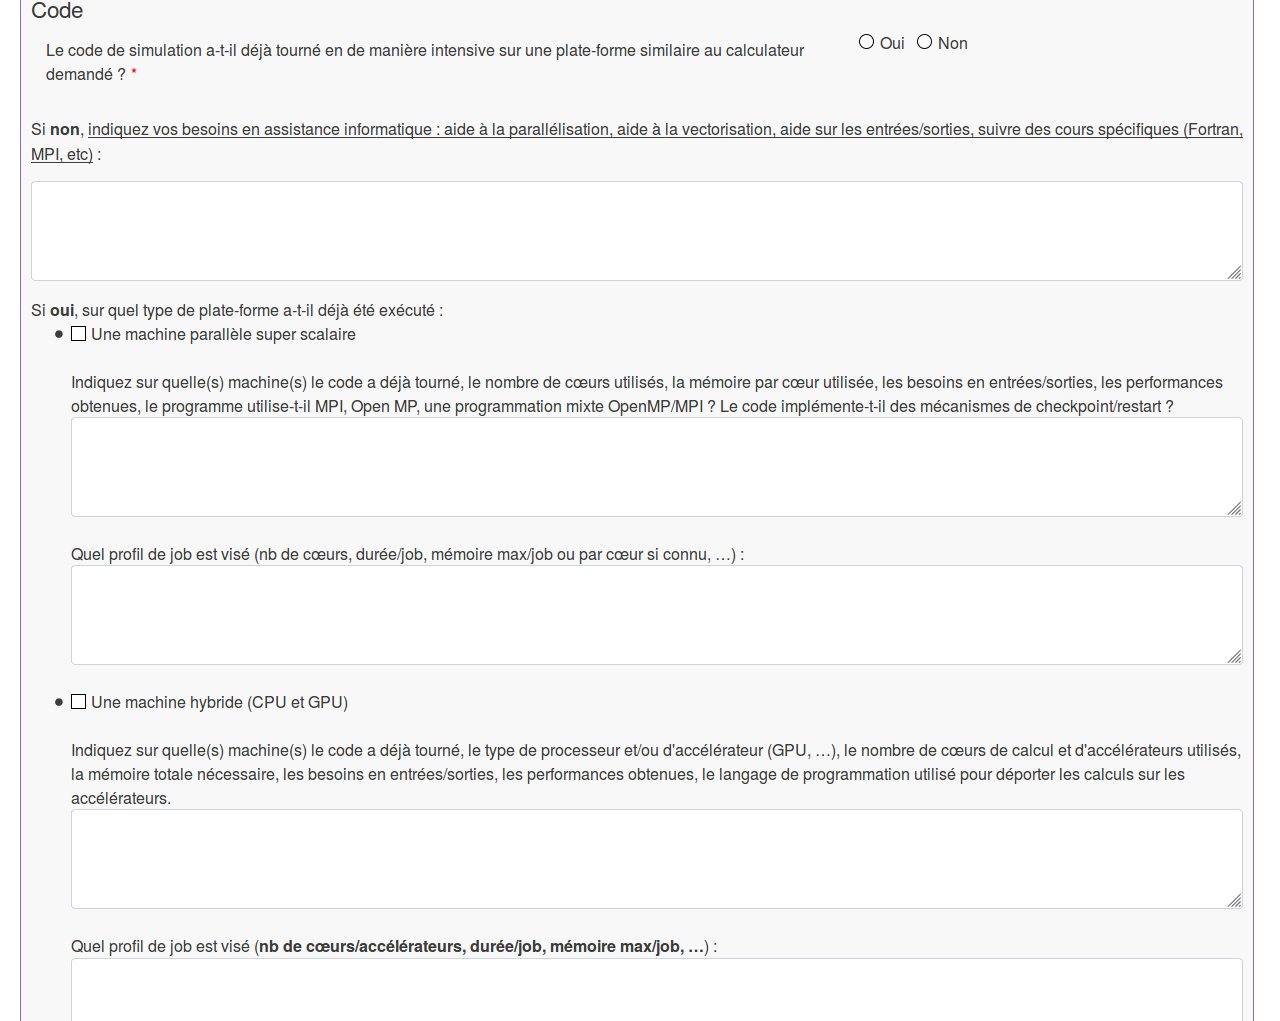
Page 6, Computing precisions
This entry page enables you to indicate all the useful information about the computing code(s) which you will use. You must indicate whether the code(s) have already been run on supercomputers (red asterick). If yes, indicate the type of computer(s), the number of CPU or GPU processors used, etc. Some responses are optional. Do not hesitate to provide all the information you have in order to enable the most precise and accurate computing adaptation possible for the large volume of hours requested.
 |
Page 7, Descriptive complement
In the following example, a request for CPU hours is shown. Here you should provide information about the number of CPUs which you anticipate using for your simulations; if you have the possibility of migrating your applications and environments to one (or more) supercomputers of another centre in case of very high demand on the chosen computer; and the timing for using the allocated computing hours (continually throughout the year, by periods, etc.):
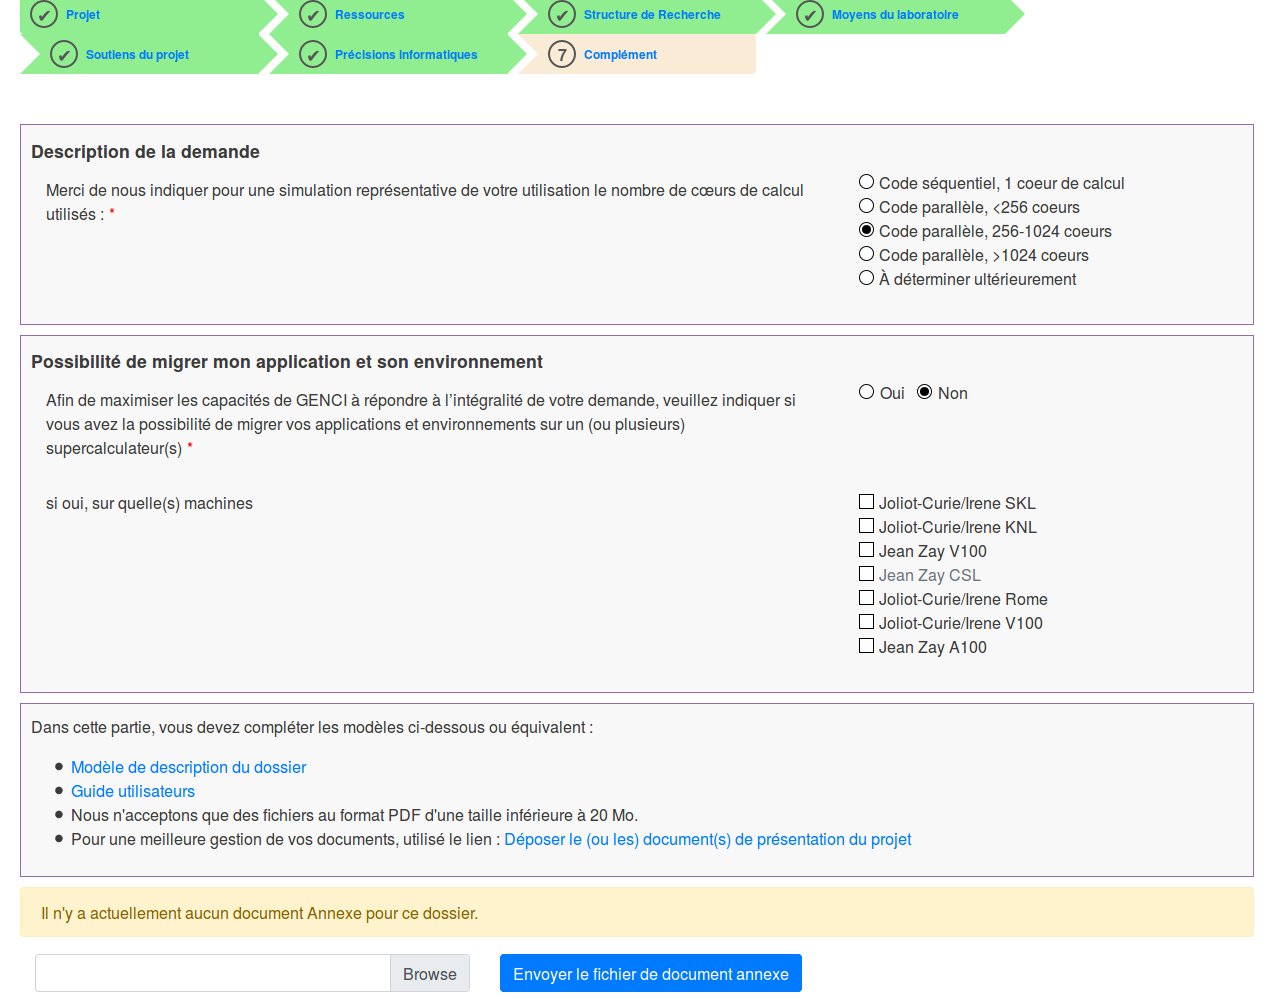 |
Then, click on the blue “Terminer” button to return to your User Space homepage which will have changed dynamically.
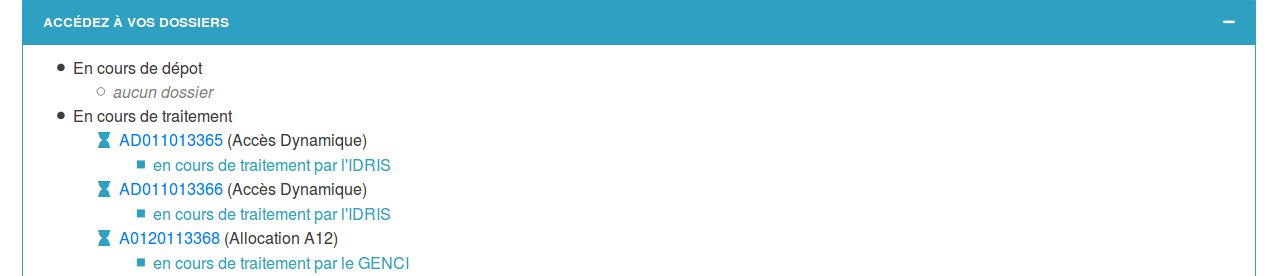
Return to the User Space
You will now find the following information about your regular access file on the homepage: of your User Space
 |
 |
 |
Comment: At this stage of the procedure, your file has not yet been validated and, therefore, will not yet have been examined for an allocation of hours. To validate your file, click on the temporary blue file number found in the orange box “LISTE DES ACTIONS REQUISES”, or in the light blue bar at the bottom of the page. This will open the following menu:
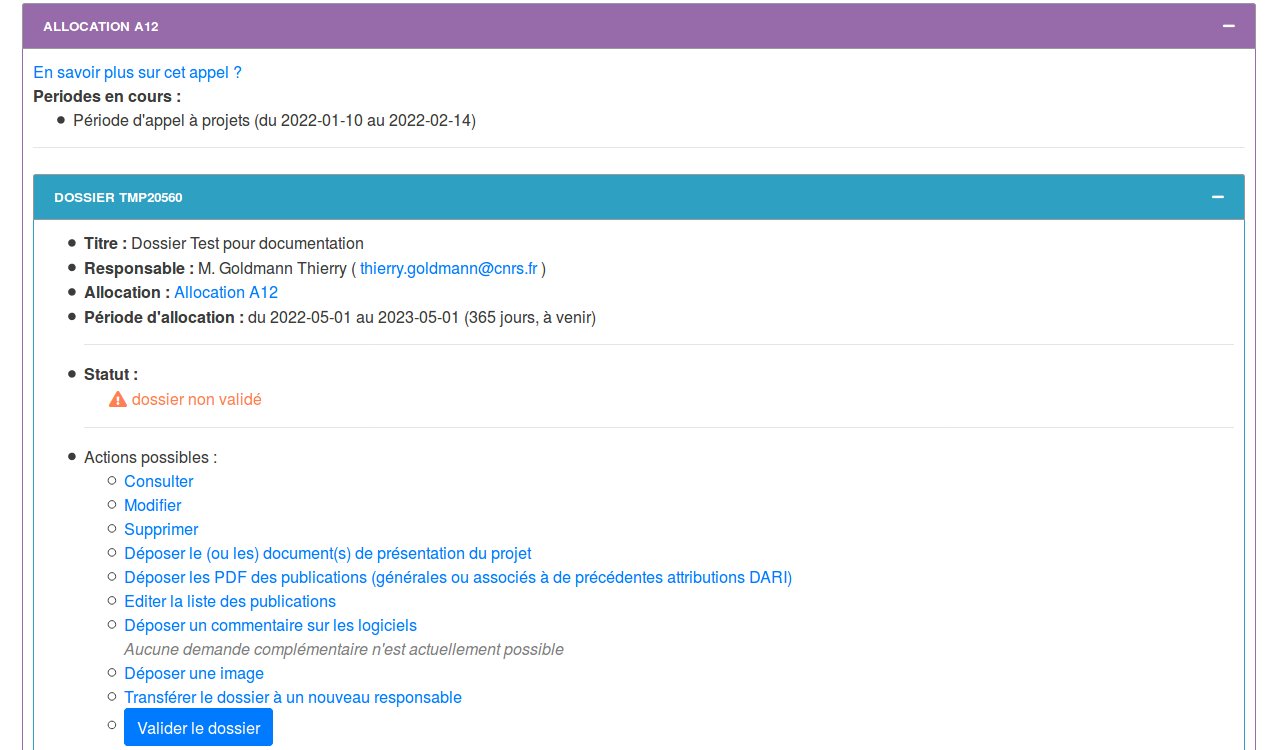 |
The title in the purple topbar is “ALLOCATION A12” because the hours requested are superior to a Dynamic Access threshold and you have an A12 Regular Access campaign number. From this menu, you can consult, modify (except for the thematic committee) or delete the file. You can submit a comment about a software (e.g. you would like a particular version or a version compiled with modifications done in your laboratory) or transfer the file to another project manager. The time period during which the computing hours are useable is also indicated (« Période d'allocation »).
Different from a dynamic access file, you must provide supplementary documents by using the links provided in the list of possible actions:
- “Déposer le (ou les) document(s) de présentation du projof your User Space et (Submit documents describing the project.)
- “Déposer les PDF des publications (générales ou associées à de précédentes attributions DARI) (Submit the PDFs of publications, general or associated with preceding DARI allocations.)
IMPORTANT: You cannot validate your file if these documents have not been submitted.
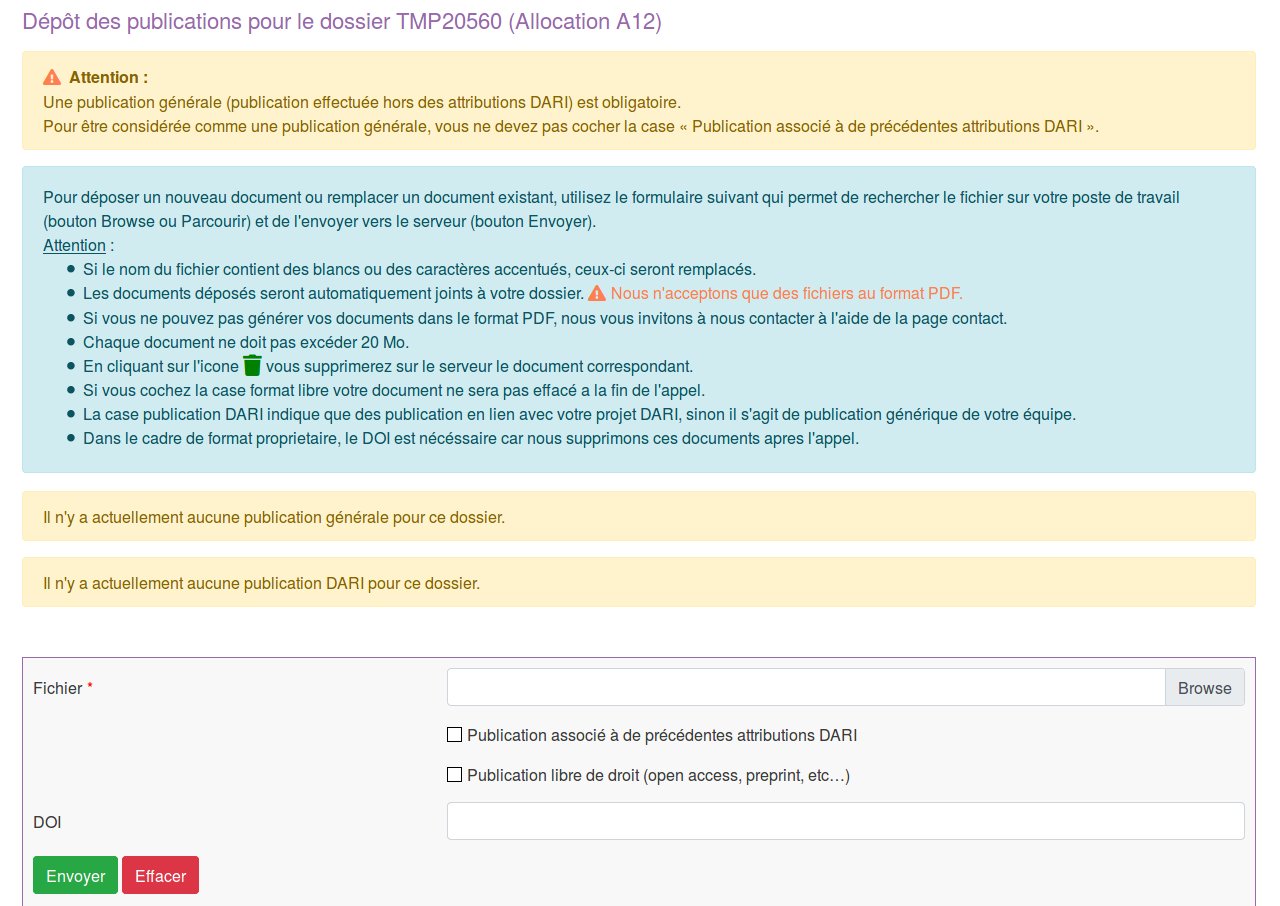
After clicking on the link to submit PDFs of publications related to your project or your research team, a specific detailed page will open which has a form enabling searching a file from your workstation:
 |
After these documents have been submitted and you have no other information to submit or corrections to make, click on the blue button “Valider le dossier”. This will result in the following information appearing dynamically on the top of your User Space (“Utilisateur”) menu on the eDARI portal :
 |
Your permanent file number appears in the second green box.
Important:
- These three green boxes will only appear if both the director of your research structure and yourself are enrolled in the Education-Research identity federation,(FER). Both you and your director will then receive an e-mail containing a link which must be clicked on in order to authenticate yourselves (dispensing you from having to submit signatures) and which finalises the procedure.of your User Space
- However, if you and your director are not both enrolled in the identity federation, only the last green box will appear indicating the identification number of your dynamic access file.
- In this case, see the orange box below : “LISTE DES ACTIONS REQUISES”. « In order for your resource request to be considered, you must submit on the site the signed signature document (visa) for the file below. » This is followed by the clickable blue file number and, in parentheses, whether it is Dynamic Access or Regular Access (avec le numéro d'appel entre parenthèses):
 |
In this example, you need to click on the second file number.
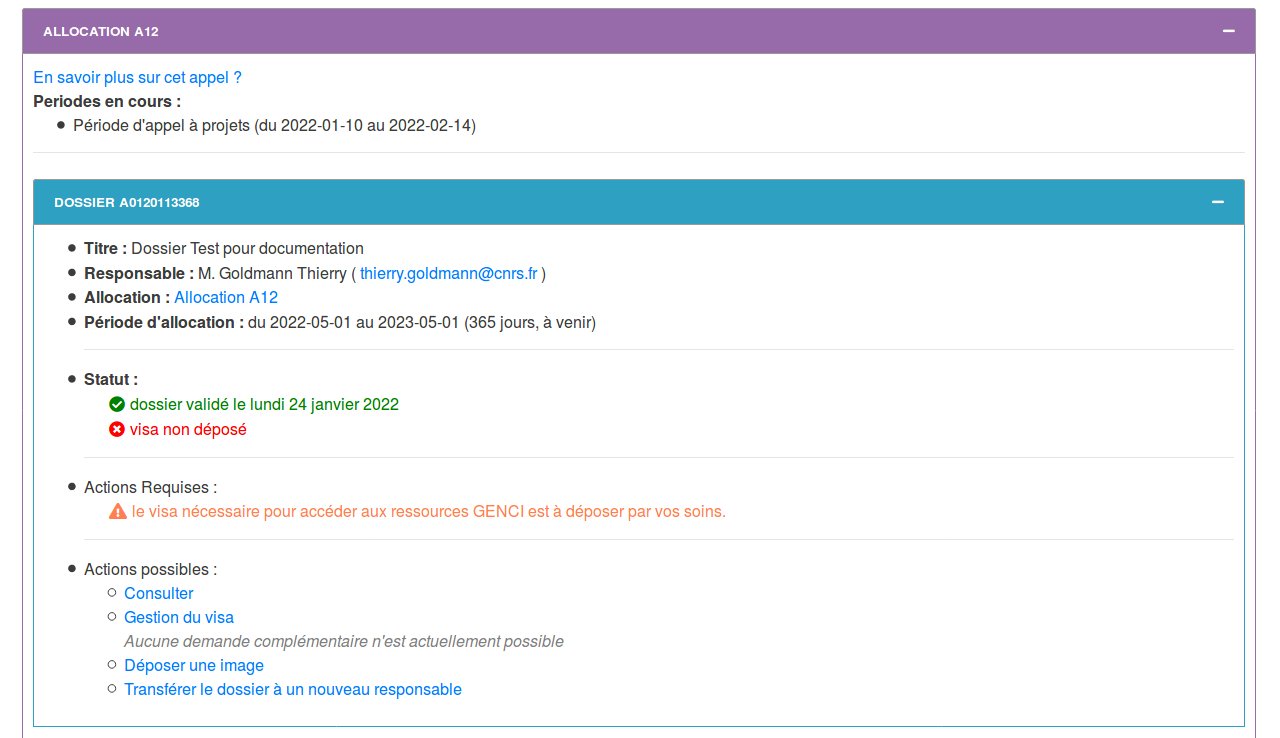
- By clicking on this file number, a box with a blue topbar will dynamically appear at the bottom of your User Space page containing a summary of your file status, indicating the date when you validated your file and that the « Visa » (signature document) has not yet been submitted to IDRIS:
 |
Click on the “Gestion du Visa” link, and then on “Télécharger le visa au format PDF”. You need to print this «visa» (signature document), sign it (and have it signed by the director of your research structure if this is indicated in this document), and then scan it.
 |
Submit the scanned document (which cannot exceed 20 MB) in PDF format by using the « Browse » button in the dialogue window. If the signed «visa» is not submitted, your file WILL NOT RECEIVE AN EXPERT ASSESSMENT by IDRIS management. Once the «visa» is sent (green button « envoyer »), you will receive the following information which confirms that the «visa» was submitted:
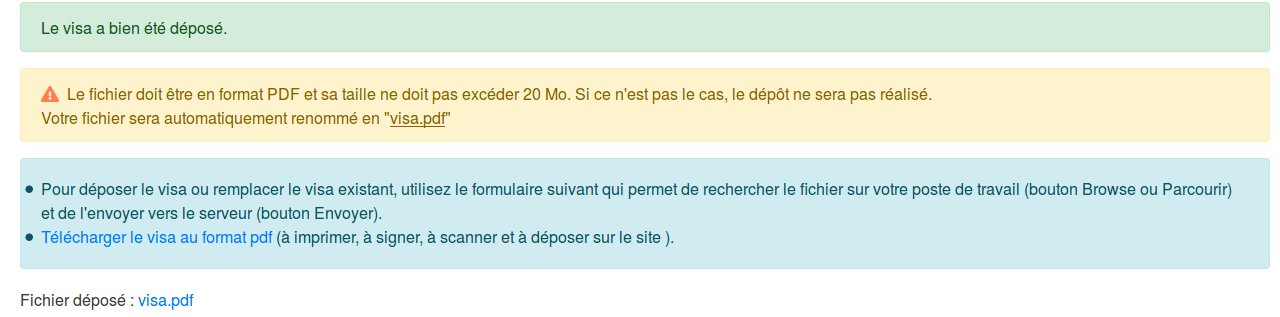 |
Moreover, a space with an orange topbar will be displayed higher on your User menu stating that no other action is required of you.
 |
If you click on your file number in the blue box at the bottom of your User space:
 |
You will obtain a confirmation that your signature document has been submitted (« visa déposé ») for your computing hours request.
 |
IDRIS will then verify that the necessary signatures are on the document. If they are, the «visa» will be accepted and the expert evaluation procedure by IDRIS management will begin.
You may submit more than one Regular Access file but they must be for different projects. The duration of a Regular Access file is one year. At the end of this period, you can renew the file.
If you encounter any problems with this procedure, please contact IDRIS by e-mail at the following address: gestutil AT idris POINT fr. If you have a technical error, please send an e-mail to the following address: svp AT cines POINT fr.